[Guide] Root Samsung Galaxy S24 Ultra using Magisk?
In the world of Android smartphones, users are always looking for ways to take one step further and unlock the plethora of features and functionalities.
If you own a Samsung Galaxy S24 Ultra, the same rules apply. While your handset does come with exceptional specifications, amazing camera attributes, a customizable OEM, and powerful hardware configuration, rooting your device will give you access to unlimited tinkering options, customizations, and administrative access to the OS.
With that said, you will also want to know the right way of rooting your Samsung Galaxy S24 Ultra otherwise you might end up bricking your phone. If you’re a beginner, don’t worry because this guide will give you step-by-step instructions on how to root Samsung Galaxy S24 Ultra using Magisk.
How to root Samsung Galaxy S24 Ultra using Magisk?
Before getting started with the rooting process, you should prepare your device by taking a complete Android backup, ensuring your device has at least 60% battery, having a USB cable, and downloading the Odin Tool on your PC.
Once you have carried out those pre-requisites, here are the steps to follow to root Samsung Galaxy S24 Ultra using Magisk –
Step 1: Enable the developer options
- First, you need to open the “Settings” menu of your Samsung Galaxy S24 Ultra
- After that, scroll down the Settings menu before selecting the “About Phone” option
- Then, you should tap on “Software Information”
- Next up, you should be tapping on the “Build Number” 6-7 times
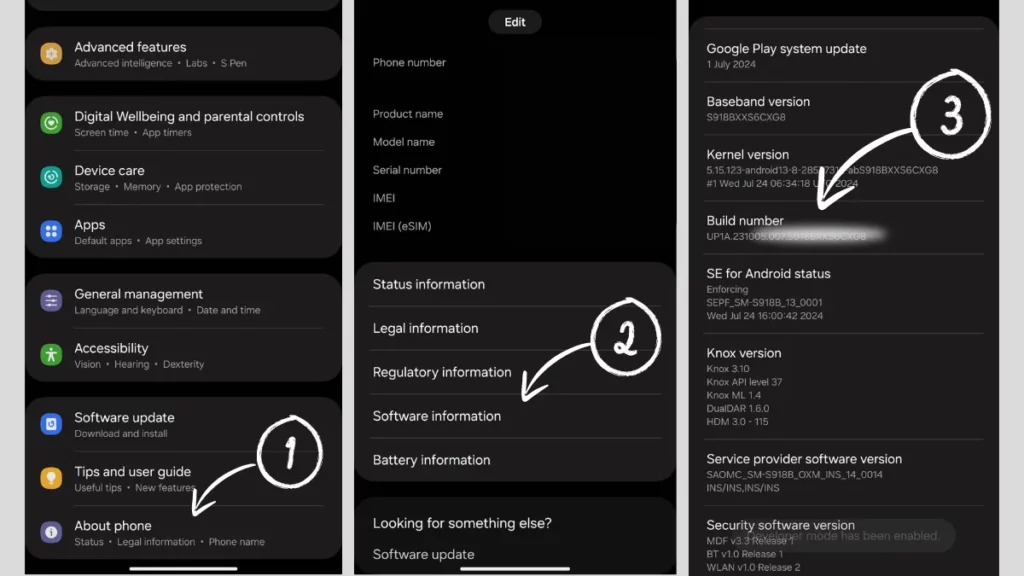
- Enter the password or pattern of your device and wait until you get the “Developer mode has been enabled” message on the screen
Step 2: Enable OEM Unlocking and Debugging
Once you have enabled the developer options, it’ll be important to enable OEM Unlocking and Debugging –
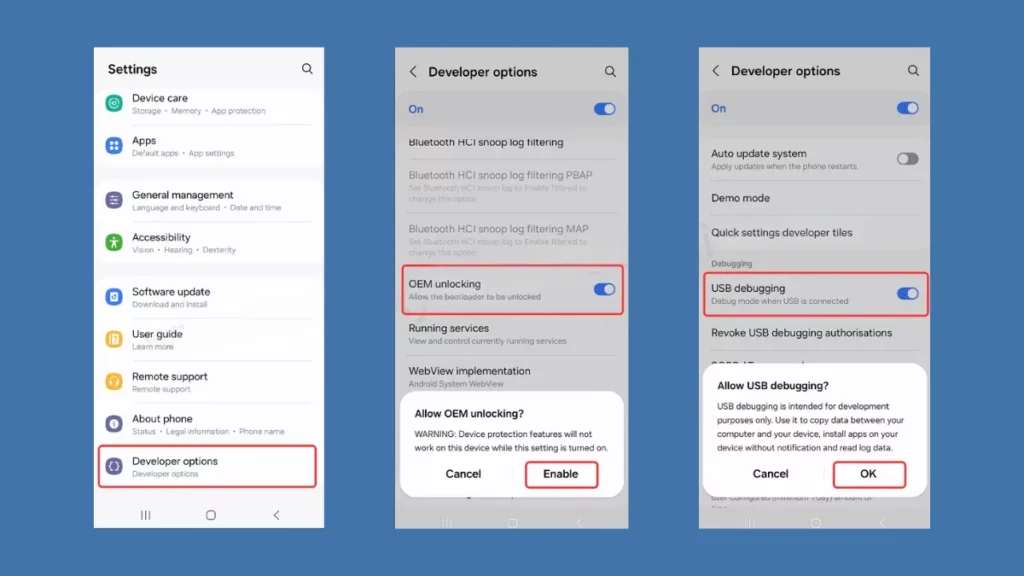
- Start by accessing the “Settings” app once more
- Head over to the “Developer Options” location
- Lastly, you should enable the “OEM Unlocking” toggle
- Confirm this process by simply clicking on the “Enable” option
- After that, scroll down and then enable the “USB Debugging” option
Step 3: Unlock Bootloader Configuration
Once the OEM Unlocking settings have been enabled, follow these steps to unlock the bootloader of your handset –
- Turn off your smartphone by pressing and holding the “Volume Down + Power” button combination before selecting “Power Off”
- Now, long press the “Volume Up + Down” buttons simultaneously
- Keep holding both the buttons and then connect the smartphone to the PC/laptop using a USB cable
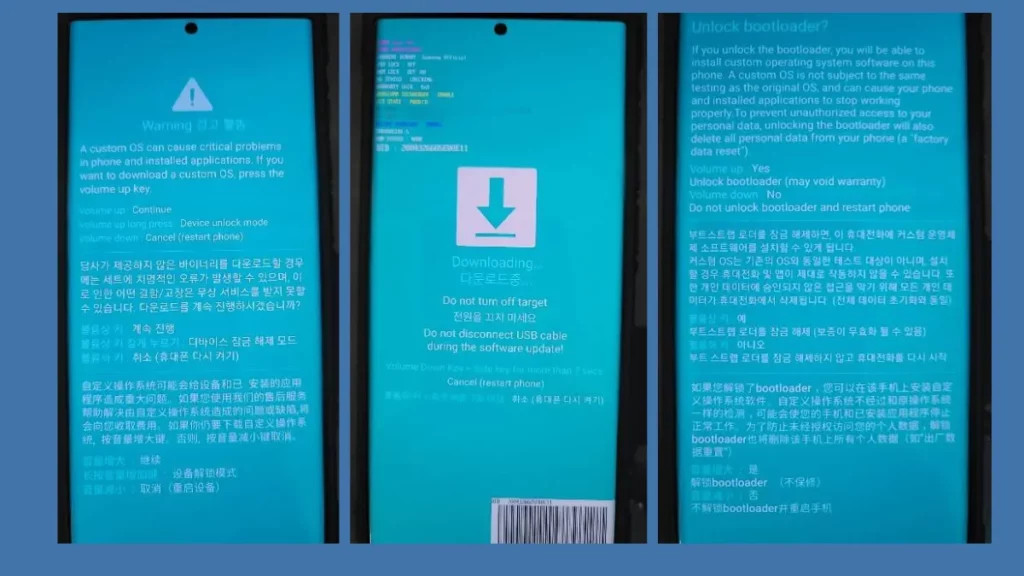
- Once that is done, you will get a Bootloader warning on the screen
- Then, you should release the volume buttons and then long press the Volume Up button to unlock the bootloader
- Once again press the “Volume Up” button for confirming Unlocking the Bootloader
- Your Samsung Galaxy S24 Ultra’s bootloader has successfully unlocked
DETAILED GUIDE: How to install TWRP on Samsung Galaxy S24 Ultra?
Step 4: Download Samsung Galaxy S24 Ultra stock firmware
Next up, you need to download the stock firmware for your Samsung Galaxy S24 Ultra. To do that, you’ll need to use the Frija Tool.
Frija Tool – Download
For using this tool, you’ll have to find out a couple of things. The first thing would be your device’s model number while the other one is the CSC code.
To look for the CSC code, you should head over to the Settings -> About Phone -> Software Information whereas you can search the model number in the Settings -> About Phone.
Once these two bits of information are found, you should follow these steps –
- On your PC/Laptop, you need to launch the Frija Tool
- Now, you should enter your device’s model number, CSC code, and IMEI/Serial Number
- After that, enable the “Auto” option before tapping “Check Update”
- Lastly, you should click on the “Download” button for receiving the firmware
Step 5: Extract and patch the boot file using Magisk
Once you have downloaded the firmware file, you should be extracting and patching the AP file via Magisk. Be cautious during this step as doing it the wrong way could be harmful to your device.
- To extract firmware, you should first unzip the Samsung Firmware zip you downloaded previously
- After that, open the firmware folder and search for the AP files
- Then, transfer this AP firmware file to the internal storage of your device
After that, you should patch the AP file using Magisk. You’ll be needing the Magisk app for patching the AP firmware file.
- Start by launching the Magisk app on your smartphone
- After that, tap on the “Install” button that comes up in the Magisk section
- Click on the “Select and Patch a file” in the options
- Look for the “AP Firmware” file that you copied from the PC
- Once the AP File patching process begins, you’ll get a pop-up message
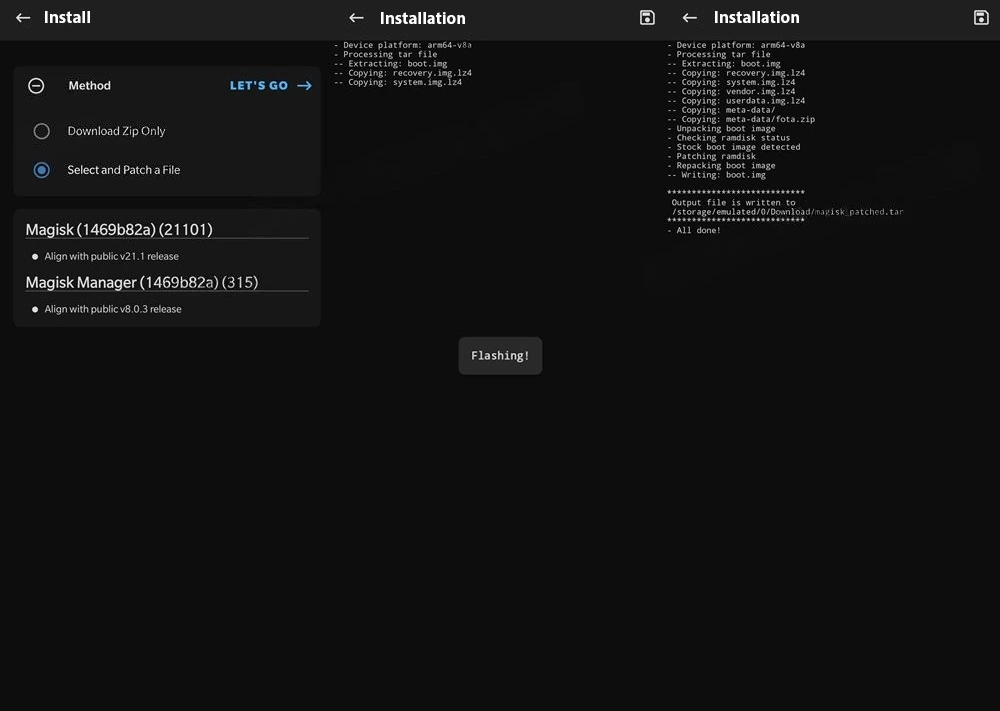
- Next up, you should head over to the Download folder and then transfer the new Magisk Patched File to your PC/Laptop
- Lastly, you should be connecting your Samsung Galaxy S24 Ultra to your PC/Laptop
Step 6: Boot to Download Mode
- Turn off your Samsung Galaxy S24 Ultra using the “Power” button
- After that, press and hold the “Volume Down + Power” buttons
- Continue holding the buttons and then connect your smartphone to your PC/Laptop
- You will get a Bootloader Warning screen
- Then, you need to press the “Volume Up” button for accessing Download Mode
Step 7: Flash the Patched AP file using Odin
Flashing the Magisk patched file will require you to download the Odin tool. You will then be able to flash the Patched AP Firmware file for gaining root access to your smartphone.
- Start by launching the Odin Tool
- Ensure that you reboot your device into the Download Mode
- Connect your Galaxy S24 Ultra to the PC using a data cable
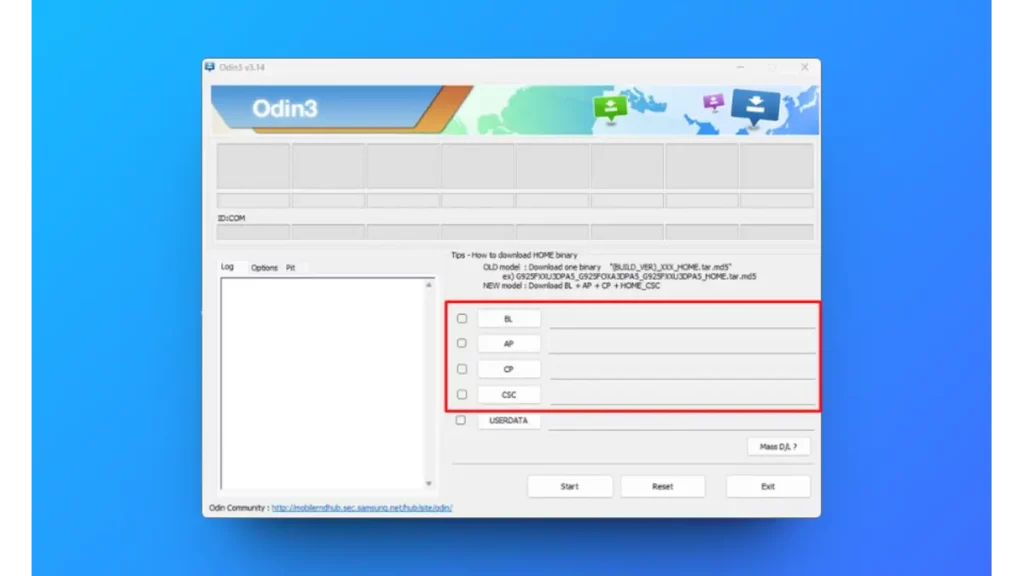
- You will get your Galaxy S24 Ultra in the ID: COM section in the blue light box as long as you’ve connected your smartphone properly
- You will get multiple file options in the Odin Tool such as
- AP – Add the patched AP firmware file
- BL – Acquire the BL file from the firmware folder
- CSC – Acquire the CSC file from the firmware folder
- CP – Acquire the CP file from the firmware folder
- After that, you should be clicking on the “Start” button to begin the flashing process
- Wait patiently until your Galaxy S24 Ultra boots up
- Congratulations, you have obtained the rooting privileges
