
The Galaxy S24 Ultra now has an official Team Win device page under the codename e3q. That support listing matters, but the recovery file still has to match your exact model and the instructions published for this device.
TWRP is optional for many root workflows; Magisk can be installed by patching Samsung firmware without TWRP. Install a custom recovery only when you actually need its backup, wiping or image-flashing tools.
Before starting, make a complete backup, charge the phone, install Samsung USB drivers and keep the matching stock firmware nearby. Do not flash a file copied from another S24 Ultra variant. If Team Win’s e3q mirror does not show a current .tar, stop and check again later instead of using a random re-upload.
Steps to install TWRP on Samsung Galaxy S24 Ultra?
Here are the steps you need to follow for installing TWRP on your Samsung Galaxy S24 Ultra –
Step 1: Enable the Developer Options
- First, you need to open the “Settings” menu of your Galaxy S24 Ultra
- After that, scroll down the Settings menu before selecting the “About Phone” option
- Then, you should tap on “Software Information”
- Next up, you should be tapping on the “Build Number” 6-7 times
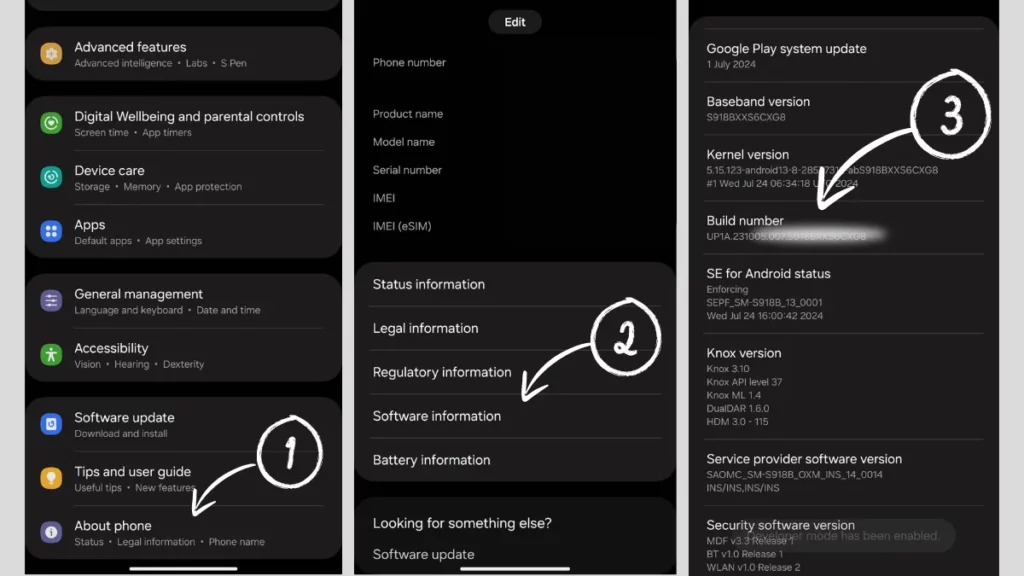
- Enter the password or pattern of your device and wait until you get the “Developer mode has been enabled” message on the screen
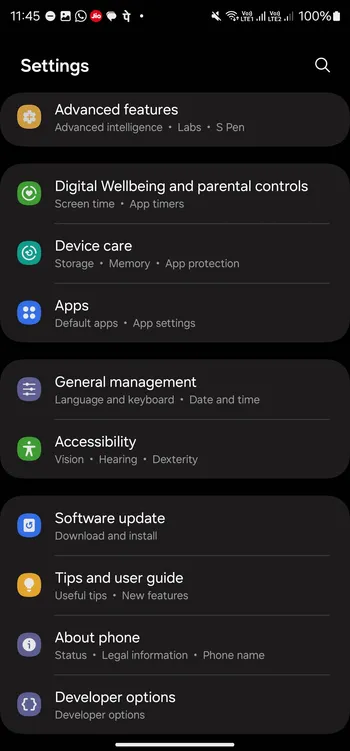
Step 2: Enable OEM unlocking
Disclaimer: The following process will void your Samsung phone’s warranty and may cause instability in how the phone works. So, it's important to be careful and fully understand the risks of rooting your phone before moving forward.
Once you have enabled the developer options, it’ll be important that you follow these steps to avoid any problems in the TWRP installation –
- Start by accessing the “Settings” app once more
- Head over to the “Developer Options” location
- Lastly, you should enable the “OEM Unlocking” toggle
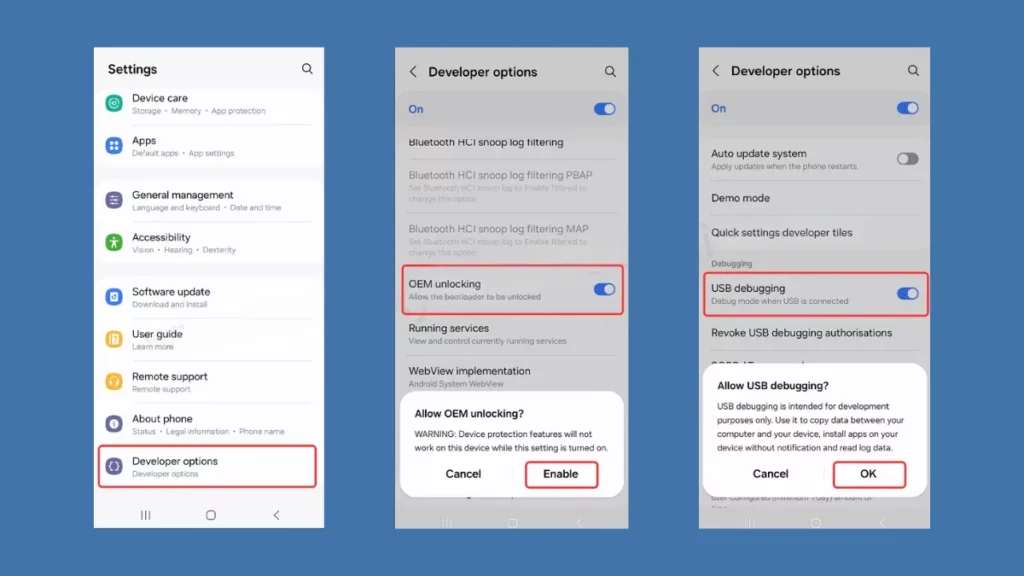
Step 3: Unlock the bootloader
Now comes the time to unlock the bootloader. You should understand the whole process if you want to gain access to the bootloader settings on your Galaxy S24 Ultra. With that said, here are the instructions you need to follow –
- Start by powering off your Galaxy S24 Ultra by pressing and holding the “Volume Down + Power” buttons before selecting the “Power Off” option
- Continue pressing the “Volume Up + Down” buttons simultaneously
- At the same time, you will also have to connect your smartphone to your PC via a USB cable
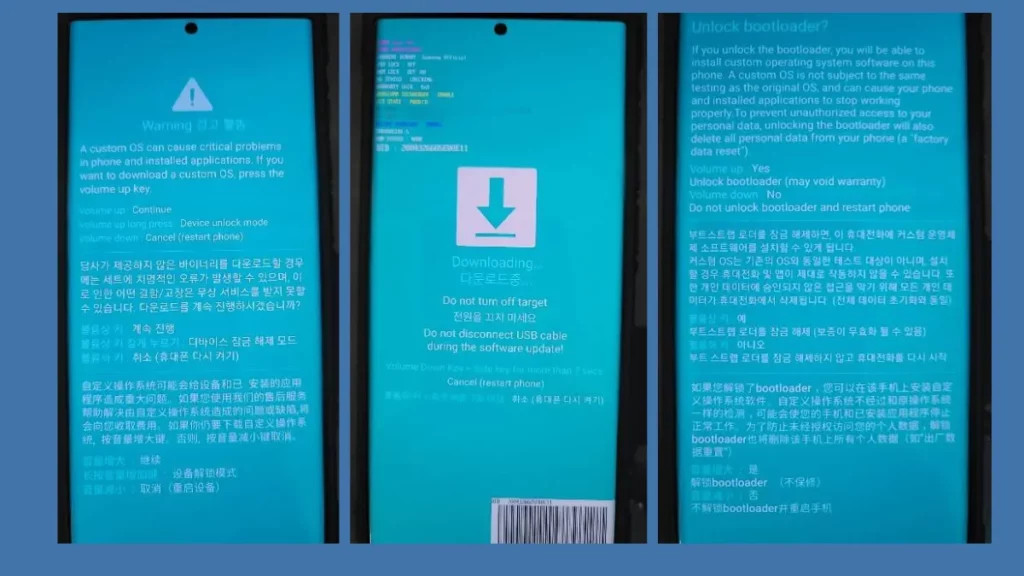
- Once you have connected your smartphone properly, you’ll notice a “Warning” notification on the screen
- After that, you should hold and press the “Volume Button” for around 7 seconds to gain access to the unlock bootloader option
- Lastly, you need to press the “Volume Up” button to confirm that you want to unlock the bootloader
The bootloader is now unlocked. The phone will reset during this process, and Knox-dependent features may no longer work even if you later return to stock firmware.
Step 4: Enable Download Mode
Next, you will have to understand how to put your Galaxy S24 Ultra in Download Mode. Typically, this mode is used as a bridge for connecting your device to the Odin Tool. It’ll also play a key role when it comes to installing TWRP or flashing firmware files on your smartphone. This will ensure that your smartphone is ready to access the developer mode. With that said, here are the steps you need to follow –
- Begin by pressing the “Volume Down + Power” button for powering off your smartphone
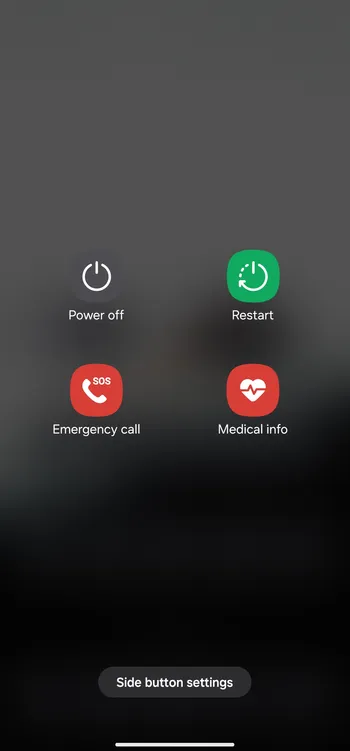
- Then, you need to long press the “Volume Down + Power” button, connect your smartphone to the PC using a data cable, and wait for the bootloader “Warning” screen to pop up
- Next up, you need to press the “Volume Up” button for accessing Download Mode
- Now, your Samsung Galaxy S24 Ultra would have entered the Download Mode
Step 5: Download the required files for TWRP installation
If you are looking to install TWRP Recovery on your Galaxy S24 Ultra, you will have to download a few files. Typically, you will require the TWRP file, vbmeta, and Disable DM Verity Force Encrypt files to carry out the process.
Using these files, you’ll be able to flash custom recovery successfully and unlock the doors to the unprecedented potential of your smartphone. With that said, make sure that you get these resources before you head over to the last portion of this procedure –
- Odin Tool (On PC) – Download
- TWRP for Samsung Galaxy S24 Ultra (On PC) – Download (e3q)
- Vbmeta.tar file (On PC) – Download
- Disable DM Verity Force Encrypt for Samsung (On your smartphone) – Download
Step 6: Install Vmeta and TWRP Recovery on your Galaxy S24 Ultra
Once you have downloaded all the necessary files from the previous step, it is time to carry out the actual installation phase of the TWRP Recovery for your Galaxy S24 Ultra. To install TWRP Recovery on your Galaxy S24 Ultra, start by flashing the Vbmeta file –
- First, launch the Odin Tool on your PC/laptop
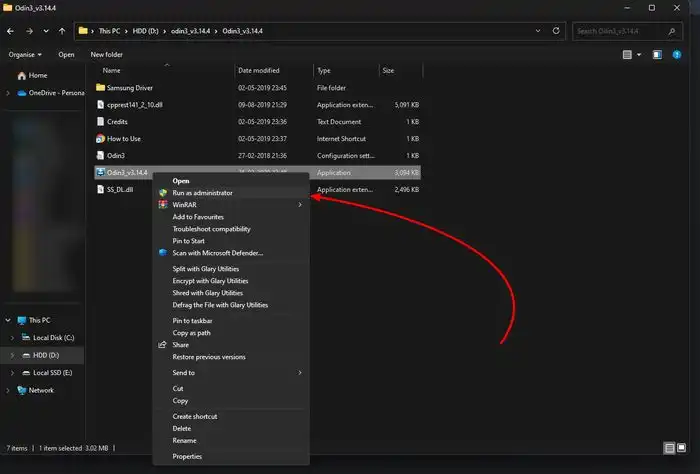
- Then, you should connect your smartphone to your PC in the download mode
- Head over to the vbmeta.tar file location before loading it in the “AP” section Odin
- After that, you need to press the “Start” button on the screen
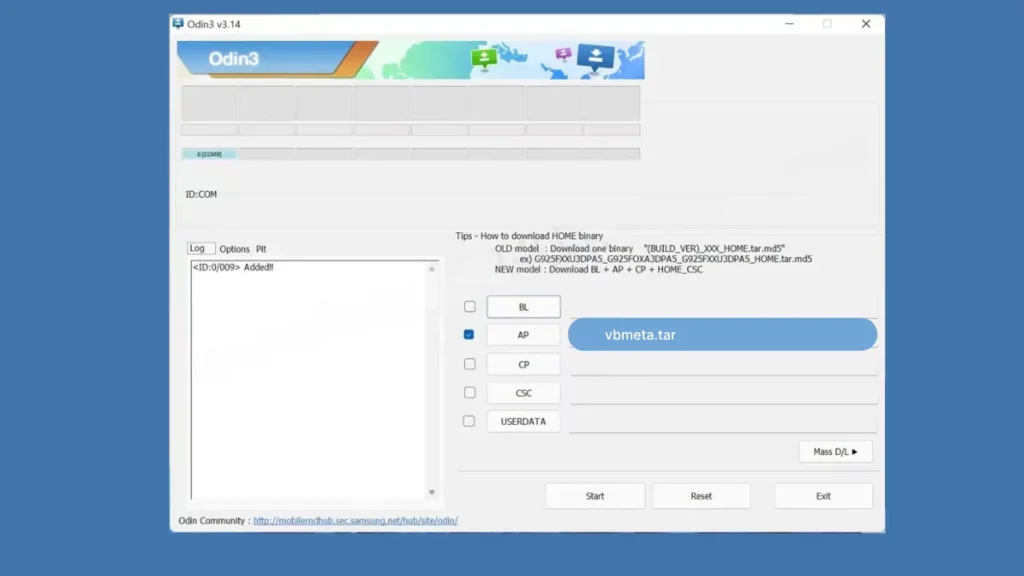
- Once you have done that, reboot your smartphone to the Download Mode
The next phase will involve flashing the TWRP file. Here are the steps to do that –
- Click on the “AP” file section before navigating to the TWRP location
- After you have selected the TWRP file, you’ll need to click the “Start” button
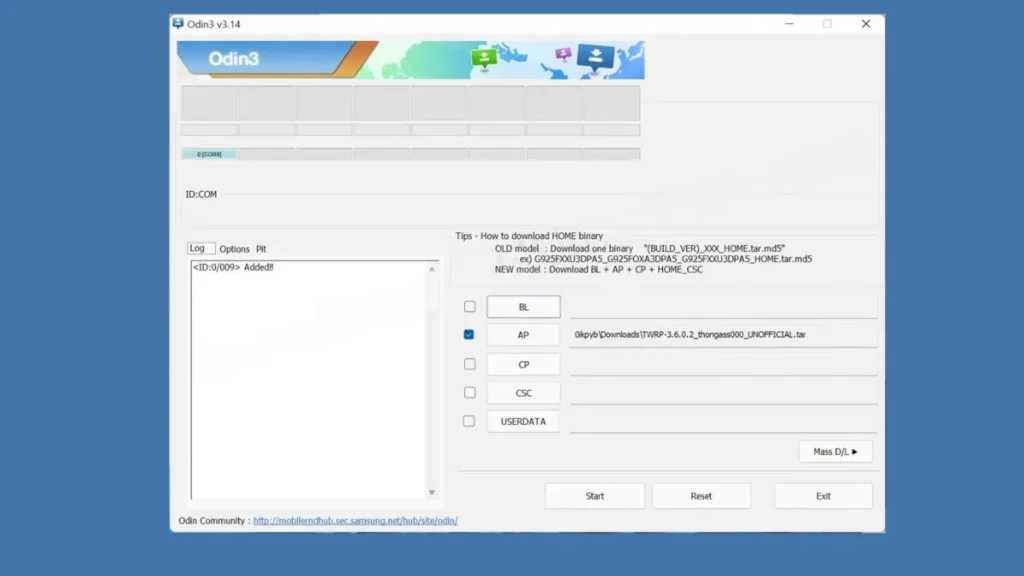
- Once the flashing ends, you need to press the “Volume Up + Power” button
- Keep pressing the two buttons until you get the “Boot Warning”
- Lastly, you need to press the “Power” button for accessing the TWRP Recovery Mode
Remember to save the Disable DM Verity Force Encrypt File in your smartphone’s internal storage. You can easily transfer the file directly from your PC once you have downloaded it from the above section. Here are the steps to flash the Disable DM Verity Force Encrypt file –
- Ensure that you access the TWRP Recovery Mode
- Click on the “Install” button for appearing on the home screen
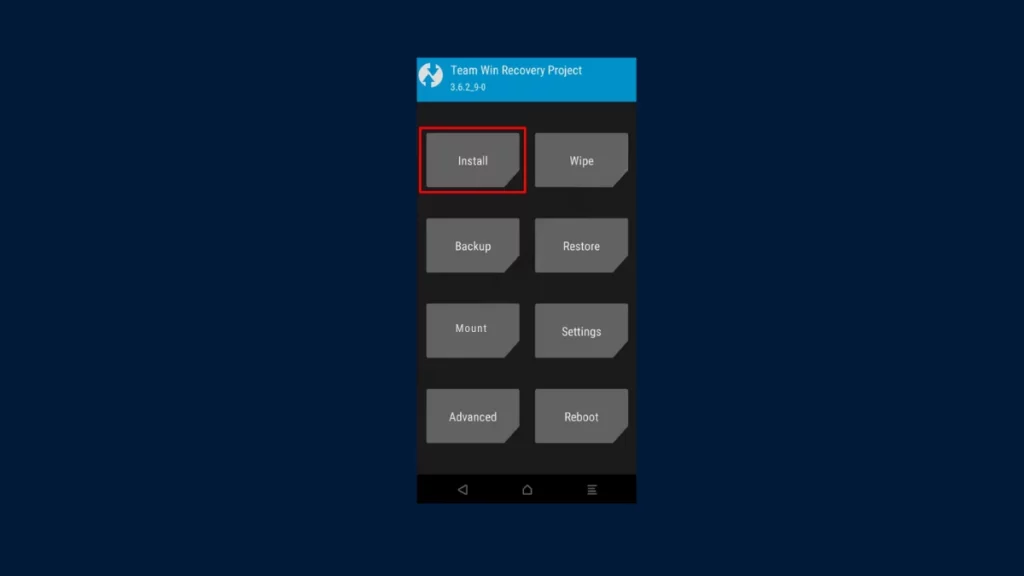
- Head over to the “Disable DM Verity Force Encrypt” file location
- Choose the file before flashing it by swiping right
- Next up, you need to head over to “Wipe” and then click on “Format Data”
- Lastly, reboot your smartphone
ROOTING GUIDE: [Guide] Root Samsung Galaxy S24 Ultra using Magisk?
So that’s how you can easily and safely install TWRP on your Samsung Galaxy S24 Ultra. If you have any question related to this guide, feel free to leave that in the comment section down below.
Was this guide helpful?
Your answer helps us keep it accurate.
Comments (0)
Comments are moderated, and published only if they are relevant to the topic and add value in a constructive way. If you disagree with something, please be polite and respectful.